The "Hair-Tie" Suture: Closing Scalp Lacerations Without Needles
Scalp wounds bleed profusely and defeat standard bandages. Learn the "Hair-Tie" technique to achieve anatomical wound closure off-grid using only the patient's hair and superglue.
You are dealing with a rockfall incident. A fist-sized stone strikes your partner’s helmet, glancing off the side and slicing open their scalp. Within seconds, their face, neck, and jacket are covered in a terrifying amount of bright red blood. You reach for your medical kit, grab a handful of adhesive Steri-Strips, and try to tape the wound shut.
It fails instantly. The tape slides off the blood-soaked hair. You are hours from a hospital, you don’t have lidocaine to numb the area, and suturing a dirty scalp with a needle in a freezing tent is a recipe for a needle-stick injury. You need a mechanical solution that works with the environment, not against it.
The Pathophysiology of Scalp Hemorrhage
To stop the bleeding, you must understand why the scalp bleeds so aggressively. The scalp is composed of five layers. The second layer is a dense network of connective tissue containing highly vascularized arteries and veins.
"Blood vessels in the scalp are firmly tethered to the dense connective tissue. When cut, they physically cannot retract and undergo vascular spasm like vessels in the arm or leg. They remain held wide open, pouring blood until mechanical pressure or anatomical closure forces them shut." – Dr. Mouine Khalil Errahmane Ameur, Off-Grid Medical Care
Direct pressure is your first line of defense, but you cannot hold your hands on a patient's head for a 12-hour evacuation. You need to reapproximate (pull together) the wound edges to tamponade the bleeding vessels. If tape won't stick and needles are out of the question, you must use the strongest structural anchor available: the patient's own hair.
The MacGyver Protocol: The Hair-Tie Suture
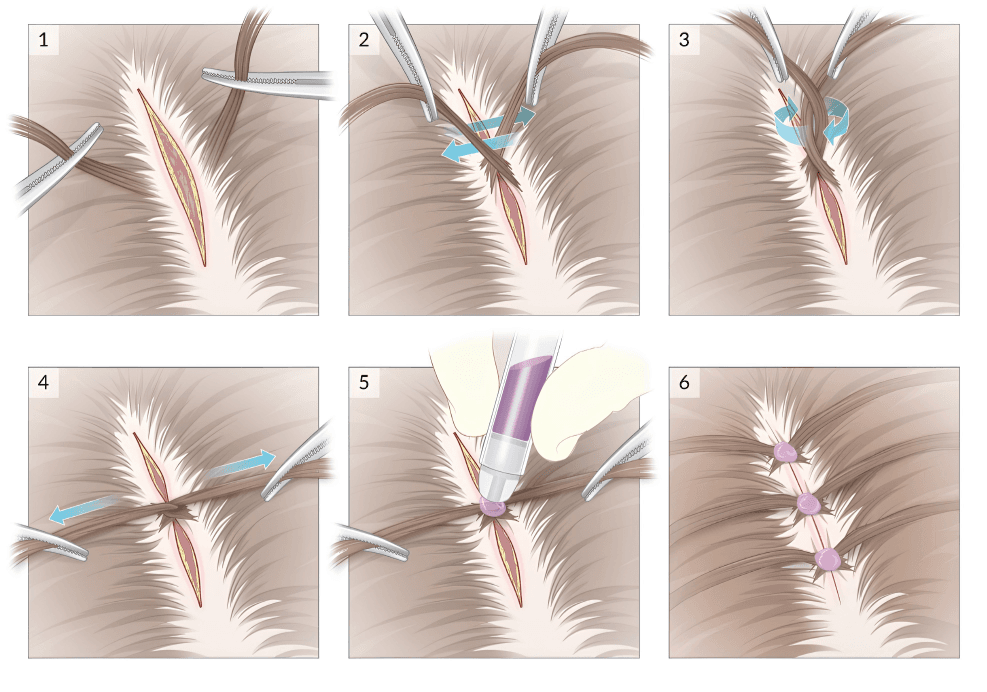
This technique requires the patient to have hair at least 1 to 2 inches long. It acts as an improvised mattress suture, using the hair follicles to pull the skin edges perfectly together.
- Step 1: Hemostasis & Irrigation: Hold direct, overwhelming pressure with a sterile gauze pad for 10 full minutes. Once bleeding slows, forcefully irrigate the wound with disinfected water (using a syringe or improvised hydration bladder) to remove rock dust and debris.
- Step 2: Isolate the Bundles: Separate two small, equal-sized bundles of hair, one from each side of the laceration, directly opposite each other.
- Step 3: Twist and Cross: Twist each bundle tightly to form rigid "ropes" of hair. Pull them across the wound, crossing them over the laceration. You will see the skin edges physically pull together.
- Step 4: Secure the Suture: You have two options. You can tie the two bundles together using a standard square knot with dental floss or strong sewing thread. Alternatively, overlap the twisted bundles and apply a single drop of cyanoacrylate (Super Glue or Dermabond) directly onto the hair crossing.
- Step 5: Repeat: Move down the laceration, repeating this process every centimeter until the entire wound is closed and bleeding ceases.
Clinical Safety Filters
Never close a wound blindly. Before tying the hair, you must meticulously palpate the skull beneath the cut. If you feel a step-off, a depression, or see cerebrospinal fluid (CSF), you are dealing with an open skull fracture. DO NOT close the wound, as this can trap building intracranial pressure or force bacteria into the brain. Apply a loose, bulky dressing and initiate an immediate "Load and Go" evacuation.
True wilderness medicine is the art of applying pathophysiology when logistics fail. Master advanced wound management, field pharmacology, and critical improvisations in the definitive 410-page survival manual: Off-Grid Medical Care.